
The only thing wrong with Halloween is it only comes once a year. If I could keep my spider webs, skeletons, ghosts, and jack-o-lanterns out all year without the neighbors calling the homeowners association (or the insane asylum), I would do it.
So when Sugar Loco asked me to do a Halloween cake pop tutorial for their very cool website, I was "batty" with excitement! Today the tutorial went live on their website and Facebook page, so I've decided to go ahead and repost it here:
Cake Pop Tutorial: Halloween
You’ve heard the saying, everything tastes better on a stick, right? Well, that snippet of culinary wisdom definitely applies to the latest trend in dessert culture: cake pops. These miniature bites of candy coated cake are perfect for celebrating any occasion or holiday, especially one as playful as Halloween. While cake pops can be temperamental little critters to make, with some practice anyone can do it. The following tutorial will serve as a guide for creating two of Halloween’s most notorious VIPs: ghosts and jack-o-lanterns!
Materials
Boxed Cake Mix and ingredients (or prepare your own cake recipe)
Container of frosting
Candy melts (white for ghosts, orange for jack-o-lanterns)
 Green tic-tac candies
Lollipop sticks
Edible pens
9”x13” baking pan
Cookie sheet
Mini ice cream scoop
Wax paper
Foam block
These ingredients can be found at your local craft and grocery stores.
 1) Bake the cake in a 9”x13” pan according to the box directions. Allow to cool completely.
3) After crumbling the entire cake, mix in half the container of frosting and mush together, adding more if needed to form a dough that can easily be rolled into a ball. An entire cake requires 1/2 to 3/4 container of frosting. The consistency is important. Too much frosting will result in wet cake pops that fall off the stick, forcing you to eat your mistakes in order to hide the evidence.


For this tutorial, I am using the entire cake which makes approximately 40-48 cake pops - perfect for a Halloween party. However, it is also possible to whip up smaller batches to have on hand during those frightful moments when the sweet tooth attacks. In this case, divide the cake into equal quarters, reserving one quarter for immediate use. Individually wrap the remaining quarters tightly and freeze for later. Remember to adjust the frosting accordingly when making smaller batches. Each quarter of cake makes approximately 10-12 cake pops.

4) Time to get messy! Using a mini ice cream scoop, uniformly measure out the dough, rolling each scoop between your hands to form small balls about golf ball sized. Place the balls on a cookie sheet lined with wax paper. 

5) While the round balls are perfect for forming plump jack-o-lanterns, a little more molding is required to bring out the ghost shapes. Using your fingertips, morph each ball into a bell shape, tweaking the bottom edges to mimic the flowing skirts so trendy amongst fashionable ghosts.
 6) Place the candy coating in a microwave safe bowl and melt in the microwave in 30 seconds increments, stirring in between. I like to use glass measuring cups because they are narrow and deep enough to completely dip a cake pop. Be careful when removing from the microwave because the glass can get very hot.
 7) Dip the end of each lollipop stick into the melted coating and insert about halfway into each cake ball. This technique is very helpful in preventing the ball from falling off the stick during the coating process.
10) Holding the lollipop stick firmly, dip the cake pop into the candy coating until it is completely submerged, and remove it in one fluid motion. Allow the excess coating to drip off, tapping gently on the side of the cup and rotating the pop so the coating does not build up on one side.


11) Prop your freshly dipped cake pops into a styrofoam block to dry. While still wet, gently insert a green tic-tac candy into the top of each jack-o-lantern.
12) Once your cake pops are completely dry, use an edible pen to sketch scary, happy, mean, or friendly faces on your Halloween characters. Remember, just like snowflakes no two ghosts or jack-o-lanterns are alike. Give them personality and flare. They’ll be so much more fun to bite into!


 6) Place the candy coating in a microwave safe bowl and melt in the microwave in 30 seconds increments, stirring in between. I like to use glass measuring cups because they are narrow and deep enough to completely dip a cake pop. Be careful when removing from the microwave because the glass can get very hot.
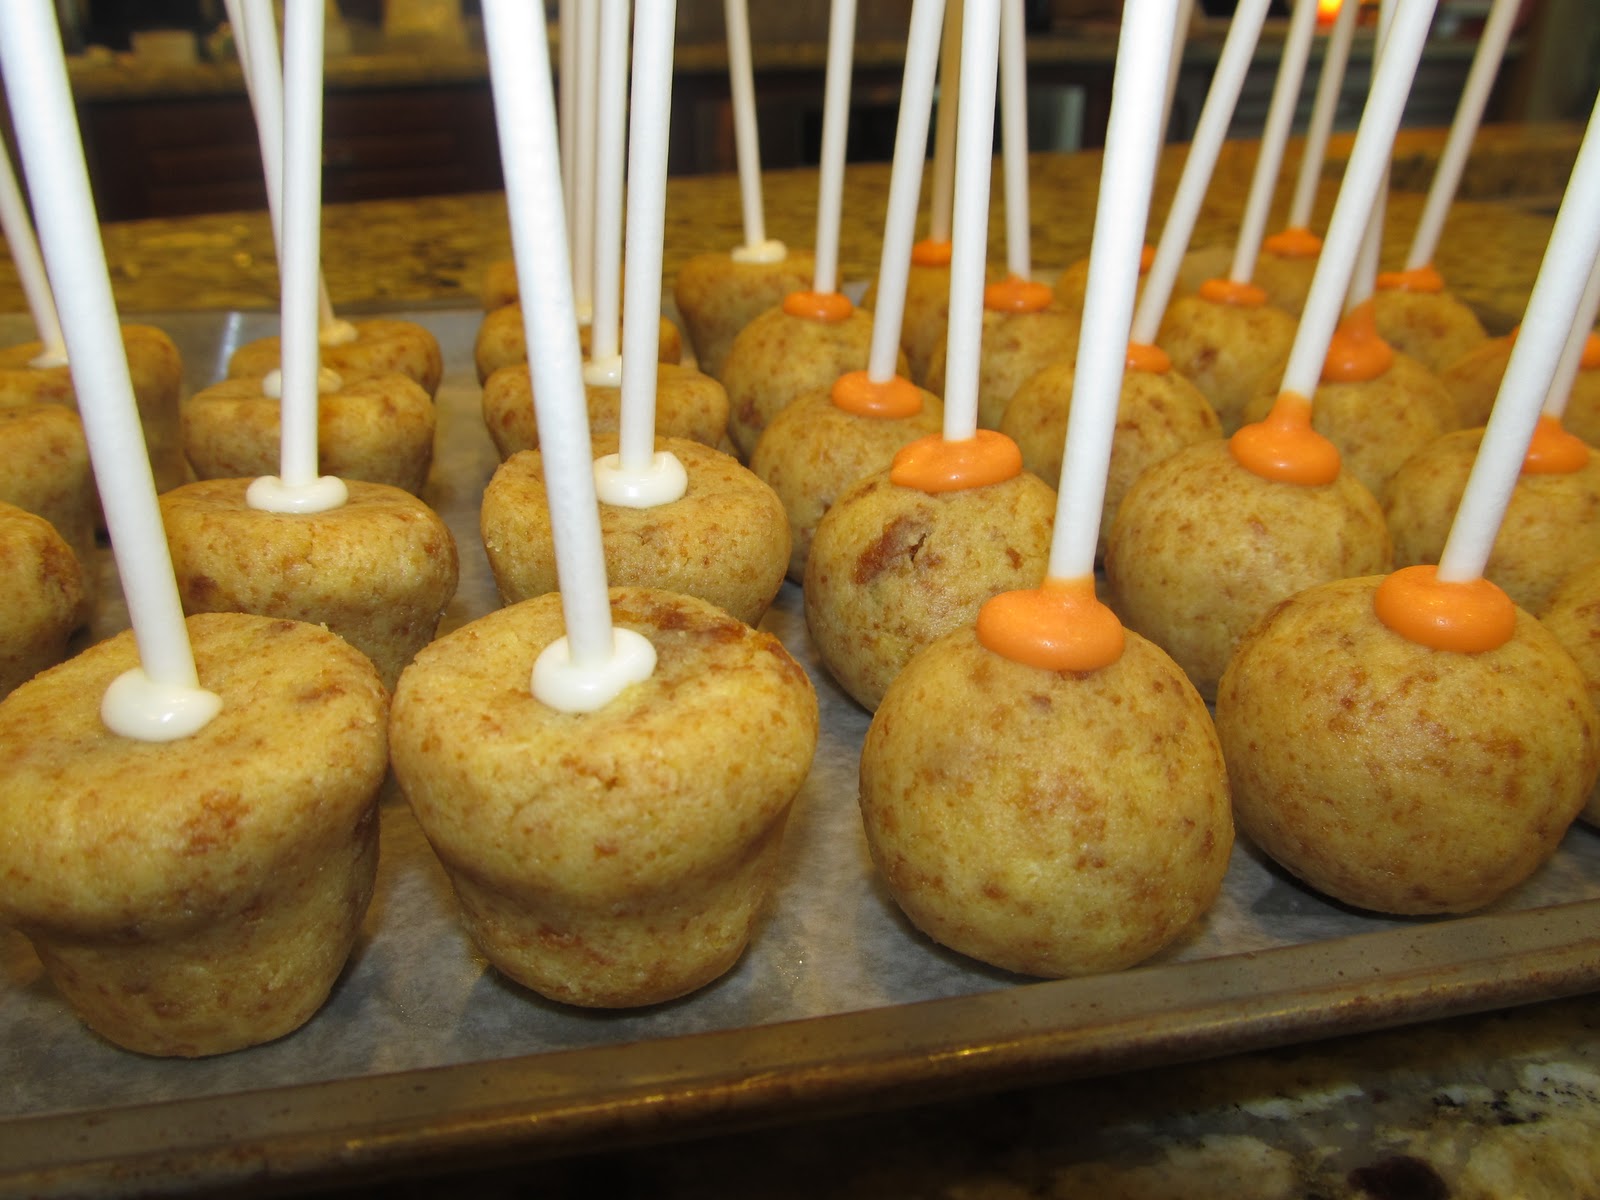
Add paramount crystals or a bit of vegetable oil to thin the coating until it is the consistency of honey.
8) Once you have lollipop sticks poking out of each ball, place the cookie sheet in the freezer for about 15 minutes. It is vital that you do not allow the balls to freeze! Firm, yes. Frozen, no. The cake will expand as it defrosts and once it comes into contact with hot melted candy coating, will result in cracked cake pops. Cracking is the bane of cake pop making and is the primary reason many people stomp out of the kitchen in frustration vowing never to make another cake pop again. Careful attention at this juncture will ensure you are not this person.
9) Relocate your cookie sheet from the freezer to the refrigerator, reserving a few cake pops on the kitchen countertop to warm up just a bit. You may need to reheat your candy coating if it is hardening, but then allow it to cool for a few minutes. Again, dipping cold cake pops into very hot candy coating can result in cracking cake pops (which can then result in temper tantrums as we’ve already discussed).
10) Holding the lollipop stick firmly, dip the cake pop into the candy coating until it is completely submerged, and remove it in one fluid motion. Allow the excess coating to drip off, tapping gently on the side of the cup and rotating the pop so the coating does not build up on one side.


Swipe your finger along the base of the stick to rid it of excess coating.


These spooky treats are sure to bring out the spirit in all your Halloween party guests!
HAPPY HALLOWEEN!


I've never seen a tutorial that shows the molding and dipping process for cake pops. I thought only Bakerella could make perfect ones... these look great! :)
ReplyDeleteI found your post via diydraw, where my Pumpkin Chocolate Cheesecake Cups are also featured on the Halloween recipes.
http://www.foodtasticmom.com/2012/10/20/pumpkin-chocolate-cheesecake-cups/